
Plywood is an incredibly versatile material that offers a vast array of possibilities for woodworking projects. The ability to bend plywood opens up opportunities for creating aesthetically pleasing furniture, intricate architectural designs, and functional products. Knowing how to bend plywood effectively is a crucial skill for anyone working with this material. In this comprehensive guide, we’ll delve deep into the process of bending plywood, exploring various techniques, materials, and tools, as well as providing a step-by-step approach to ensure perfect bends every time.
What is Plywood?
Plywood is an engineered wood product that consists of thin layers, or veneers, of wood bonded together under heat and pressure. The key feature of plywood is its layered construction, where each veneer is laid with its grain running perpendicular to the one beneath it. This alternating grain structure gives plywood strength and stability, making it less prone to warping or cracking compared to solid wood. The number of layers can vary, and plywood is available in a wide range of thicknesses, depending on the intended application.
The beauty of plywood lies in its combination of flexibility, strength, and uniformity. Unlike solid wood, which has natural imperfections like knots, plywood offers a more consistent appearance and is typically more cost-effective. When considering how to bend plywood, understanding the structure of the material is key, as the layers and adhesives influence how well the plywood can be manipulated into curves.

Why Bend Plywood?
There are several reasons for bending plywood. The ability to create curved shapes allows woodworkers to push the boundaries of traditional woodworking, resulting in more dynamic, modern designs. Curves are often seen in furniture, cabinetry, and architectural features like walls, arches, and ceiling treatments.
Some of the most common uses of bent plywood include:
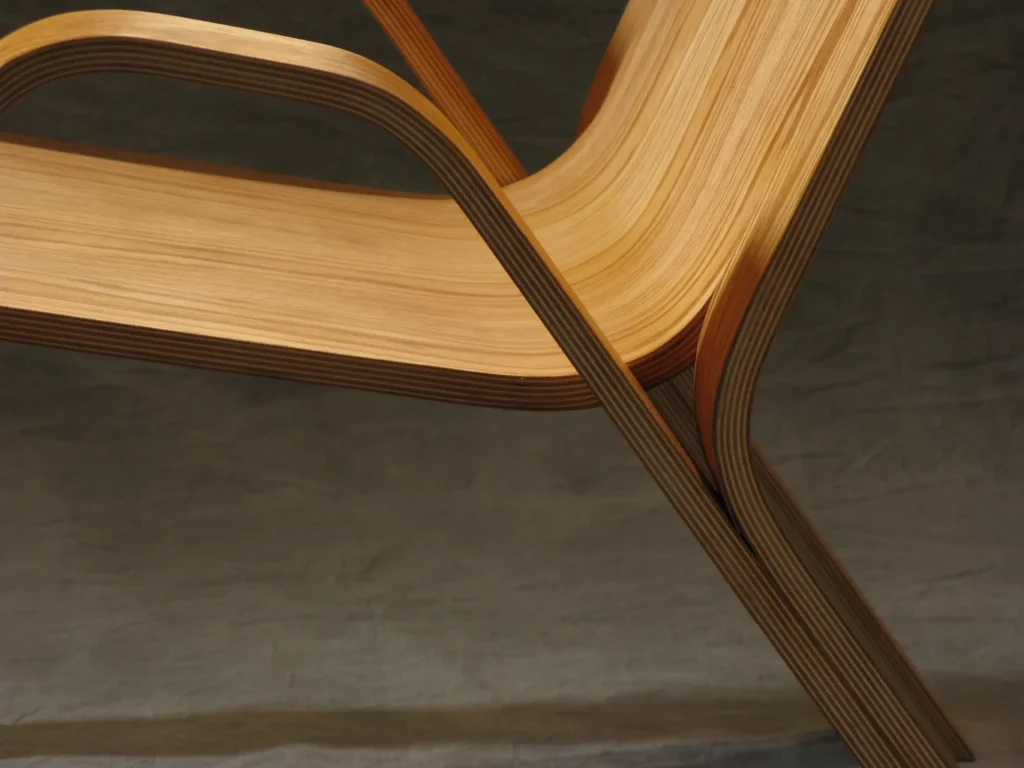
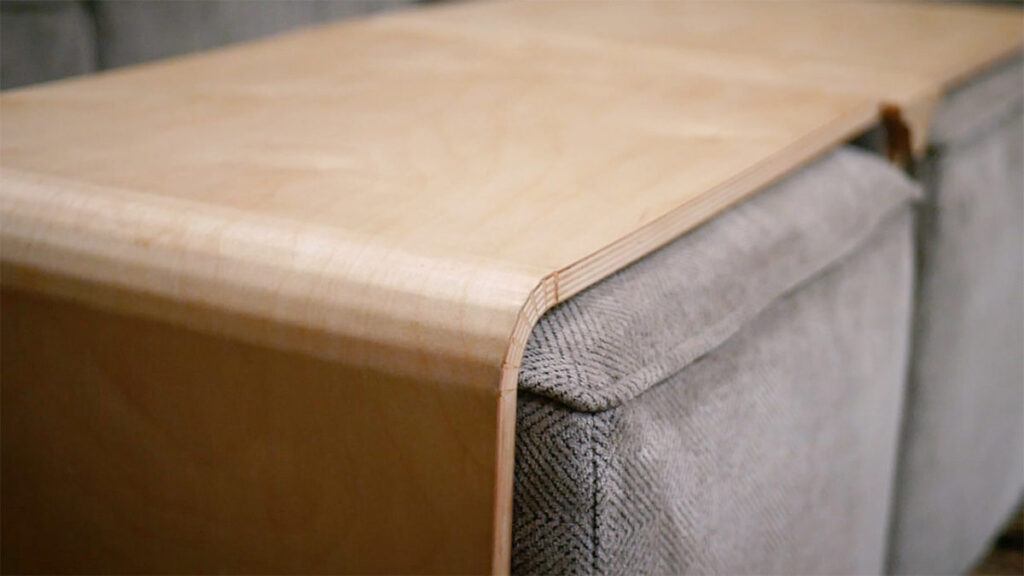
- Furniture Design: Bending plywood is particularly popular in contemporary furniture, where curved shapes are both visually appealing and practical. The flexibility of bent plywood enables designers to craft innovative pieces like chairs, tables, and shelving units.
- Architectural Elements: In architecture, bent plywood is used to create flowing, organic forms. Curved walls, domes, and curved ceiling panels are just a few examples where bent plywood shines.
- Product Design: Plywood’s versatility extends beyond furniture. It’s used in a variety of consumer products such as lighting fixtures, musical instruments, and even in automotive applications, where lightweight, durable, and flexible materials are required.
In comparison to other materials like solid wood or metal, bent plywood offers several benefits. It is lighter, more cost-effective, and can achieve smoother, more uniform curves. As a result, it is a preferred material for many design professionals seeking to combine both aesthetic beauty and practical functionality.
Plywood and Its Properties
Grain Orientation and Its Impact on Bending
One of the most important factors to consider when learning how to bend plywood is the direction of the grain in the wood layers. The orientation of the grain affects how easily the plywood will bend and how prone it will be to breaking or cracking.
- Grain Direction: The plywood’s grain typically runs perpendicular to the adjacent layers, alternating at 90-degree angles with each layer. When bending plywood, the grain direction plays a critical role. The plywood is much easier to bend when the grain is running perpendicular to the curve. In contrast, if the grain is running parallel to the curve, the plywood will resist bending and may split or crack. For tight bends, you need to ensure that the grain runs perpendicular to the bend line.
- Consideration for Flexibility: The grain direction can either increase or decrease the flexibility of the plywood. When you know how to shape plywood correctly, you’ll realize that plywood bends better with the grain in the right orientation. A properly oriented grain ensures that the material can stretch and compress without breaking.
In some cases, you may encounter «bending-grade» plywood, which is manufactured with flexibility in mind. This type of plywood typically has the grain aligned in such a way as to facilitate easier bending.
Thickness of Plywood
The thickness of plywood is another significant factor when deciding how to bend a sheet of plywood. Thicker plywood is stiffer and more resistant to bending, so it requires additional techniques to manipulate it into curves. On the other hand, thinner plywood can bend more easily but may not have the strength needed for structural applications.
- Thin Plywood: Thin plywood (typically 1/8 inch or 1/4 inch thick) is ideal for making small, tight curves. However, it is not as durable as thicker plywood and is better suited for decorative purposes rather than load-bearing applications.
- Thick Plywood: Thicker plywood (such as 1/2 inch or 3/4 inch) is stronger and more durable, making it perfect for larger furniture or architectural projects that require both flexibility and strength. While thicker plywood is more difficult to bend, techniques like steaming, kerf cutting, or laminating can make it more pliable.
When bending thicker plywood, it’s crucial to carefully consider the radius of the curve you want to achieve. Large, gradual bends are easier to make with thicker plywood, while sharp, tight bends require thinner plywood or special techniques.
Types of Plywood Suitable for Bending
Not all plywood is suitable for bending. Choosing the right type of plywood can make a significant difference in your project’s success.
- Flexible Plywood: This type of plywood is designed to be highly flexible and easy to bend. It is typically made with thin veneers and a more pliable adhesive, allowing it to take on complex shapes and curves without cracking or breaking. Flexible plywood is often used in furniture design and decorative pieces that require more intricate, rounded forms.
- Bending-Grade Plywood: Specifically engineered for bending, bending-grade plywood (sometimes referred to as «bending plywood») is a premium material that combines flexibility with strength. The adhesive used in bending-grade plywood allows it to bend more easily than standard plywood. It is ideal for projects that require a smooth, controlled curve.
When learning how to manipulate plywood into curves, opting for bending-grade plywood can save time and reduce the likelihood of failure, especially for more complex designs.
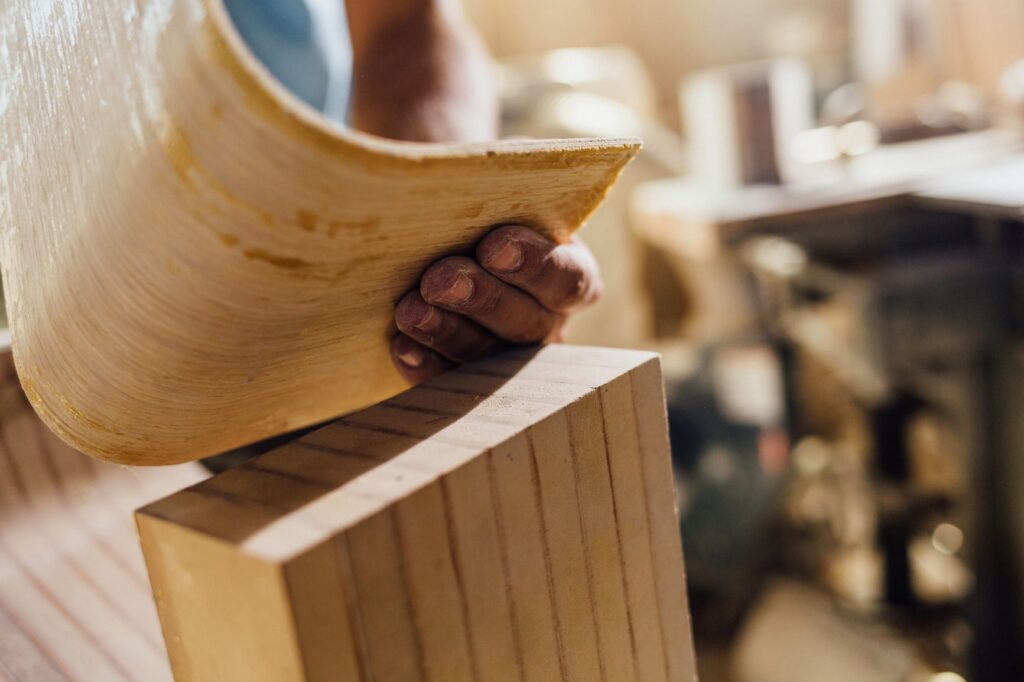
Techniques for Bending Plywood
There are several tried-and-true techniques for bending plywood, each with its own strengths and limitations. Depending on your project’s needs and the desired curvature, you may need to experiment with different methods.
Wet Bending (Moisture Technique)
Wet bending is one of the most common methods used to bend plywood. It involves softening the wood fibers by applying moisture, which makes the material more pliable and easier to manipulate. Wet bending is ideal for large curves, as the moisture allows the plywood to take on more gradual bends without cracking.
To perform wet bending:
- Soak or Steam: The plywood is either soaked in water or exposed to steam. Soaking can take several hours, while steaming typically takes around 30 minutes to an hour, depending on the thickness of the plywood.
- Wrap the Plywood: Once moistened, the plywood is wrapped in plastic or cloth to retain the moisture during the bending process. This is particularly important if you are using the soaking method, as it helps the plywood remain flexible for longer periods.
- Bend the Plywood: The plywood is then bent around a mold or form, applying gentle, even pressure. Clamps or straps are used to secure the plywood in place.
- Dry and Set: After the plywood has been bent into the desired shape, it is left to dry in the form. The moisture will evaporate, and the plywood will hold its new shape once completely dried.
Dry Bending (Heat and Pressure Technique)
Dry bending involves the application of heat to soften the adhesive used in the plywood. This technique is often used for thicker plywood, which may not bend as easily with moisture alone. Heat causes the plywood to become more flexible, allowing it to be bent around a form.
To dry bend plywood:
- Apply Heat: You can use a heat gun, hot plate, or even an oven to heat the plywood. The heat will soften the plywood’s adhesive, making it more pliable.
- Bend the Plywood: Once heated, the plywood is gently bent around a mold or jig. The use of a form is essential for keeping the bend even and controlled.
- Cool and Set: Once the plywood has been bent into shape, it is left to cool and harden in the form. This step is crucial to ensure that the plywood retains its new shape.
Dry bending is a good option when you want to avoid water damage or when dealing with thicker plywood that cannot be easily bent with the wet method.
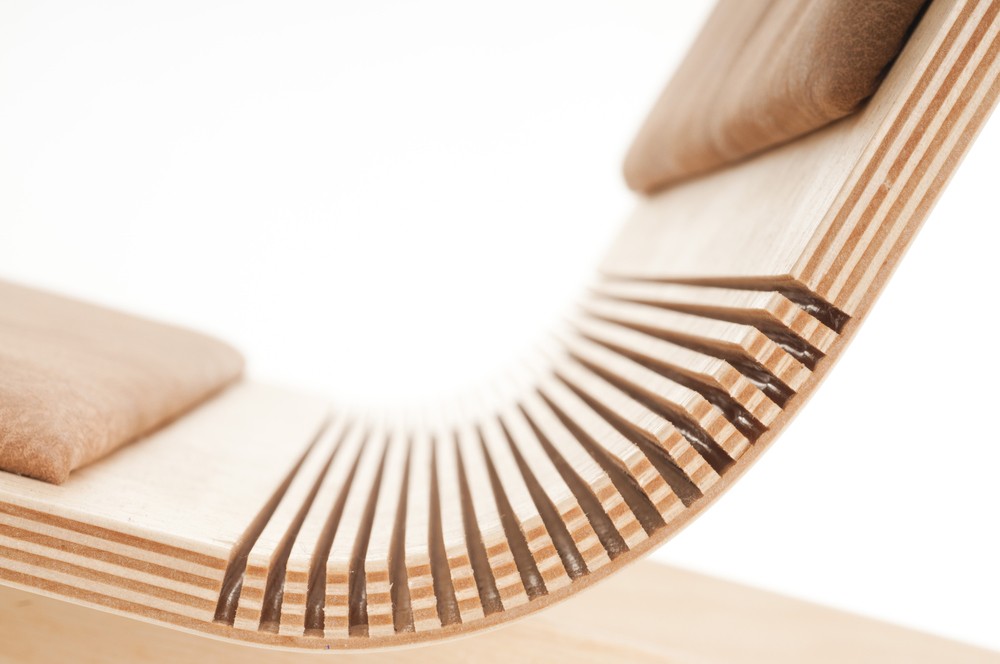
Kerf Bending
Kerf bending is a technique where partial cuts, or “kerfs,” are made along the back side of the plywood to allow it to bend more easily. This technique works best with thicker plywood and is often used for making tight, sharp bends.
To use kerf bending:
- Cut Kerfs: Use a table saw or circular saw to make evenly spaced cuts along the back of the plywood. These cuts should be shallow enough to leave the surface intact but deep enough to allow flexibility.
- Bend the Plywood: Once the kerfs are cut, the plywood can be bent along the cut lines. The kerfs reduce the stiffness of the plywood, allowing it to bend more easily.
- Clamp and Secure: After the plywood is bent, it is clamped into place and glued, ensuring that the kerf cuts hold their shape.
Kerf bending is a powerful technique for achieving tight, controlled curves, but it is essential to plan the kerf cuts carefully to ensure the finished curve is smooth and even.
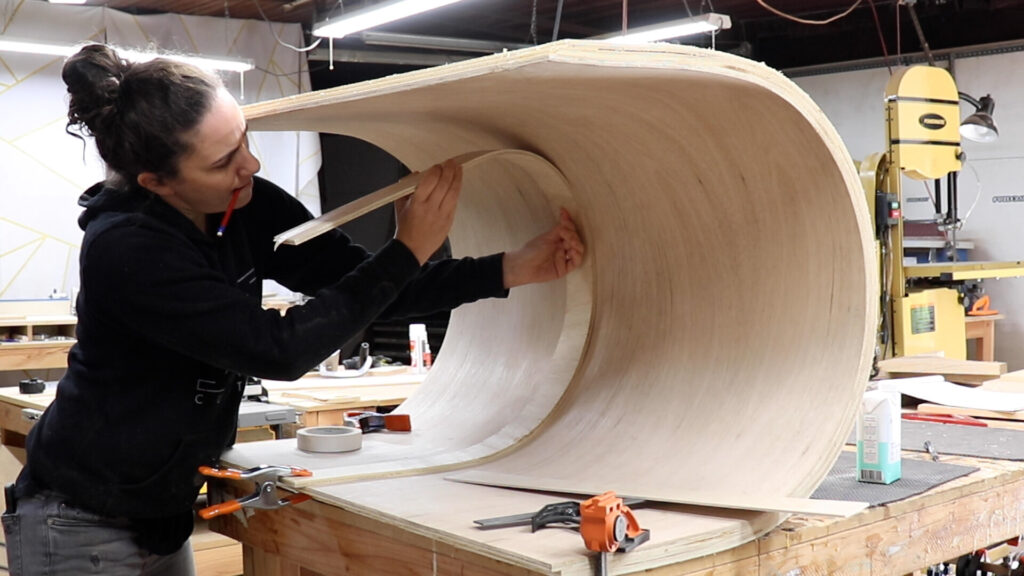
Laminating or Layered Bending
Laminating involves gluing multiple thin layers of plywood together to form a single, more flexible sheet. This technique is used for creating precise, controlled curves that require strength and stability.
To laminate plywood:
- Cut Thin Strips: Cut the plywood into thin strips, typically no more than 1/8 inch thick. These strips will be glued together to form the final shape.
- Glue the Strips: Apply glue between each strip and stack them on top of one another. Each layer will be bent slightly as it is added.
- Apply Pressure: Use clamps or a press to hold the strips together while they cure. The pressure ensures that the plywood holds the desired shape.
Laminating plywood is particularly useful for creating consistent, smooth curves, especially when dealing with thicker plywood or large-radius bends.
Cold Bending
Cold bending involves using mechanical force to bend the plywood without applying heat or moisture. This technique works best for thinner plywood and larger, more gradual curves.
To perform cold bending:
- Cut the Plywood: Start by cutting the plywood to the required dimensions.
- Bend the Plywood: Using a bending press or jig, apply even, steady pressure to bend the plywood into the desired shape.
- Clamp and Set: Once the plywood is in the desired position, clamp it and let it set until it retains the shape.
Cold bending can be a quicker and simpler method for large-scale projects that don’t require complex, tight curves.
Tools and Equipment for Bending Plywood
The right tools are essential for achieving successful bends in plywood. The following equipment can help ensure smooth, controlled bending.
Steam Box
A steam box is a chamber used to generate steam, which softens the wood fibers in plywood. It is particularly useful for large-scale bending projects. You can either purchase a steam box or build a DIY version using PVC pipes and a steam generator.
Bending Jigs and Forms
Bending jigs and molds are crucial for guiding plywood into the desired shape. These tools help ensure that the curve is even and consistent. You can create custom forms for complex shapes or purchase pre-made jigs for specific curves.
Clamps and Presses
Clamps are used to hold the plywood in place while it dries or cools. Bar clamps, C-clamps, or pipe clamps are commonly used, depending on the size and type of bend. A bending press is a more specialized tool that applies uniform pressure to the plywood, ensuring a controlled, consistent bend.
Saws for Kerf Cutting
To make kerf cuts, you’ll need a saw capable of making precise, evenly spaced cuts. A table saw or circular saw is perfect for this purpose. Accurate kerf cutting is essential for smooth and consistent bends when using this technique.
Step-by-Step Guide on How to Bend Plywood
Now that you’re familiar with the different techniques and tools for bending plywood, let’s walk through the steps for a successful bending project.
Step 1: Select the Right Plywood
Start by selecting the appropriate plywood for your project. Consider factors such as thickness, grain direction, and type. For tighter curves, opt for thinner plywood or flexible plywood.
Step 2: Prepare the Plywood
Cut the plywood to the desired size, then sand the edges to smooth out any rough spots. Prepare the plywood by soaking, steaming, or applying heat.
Step 3: Apply Moisture or Heat
For wet bending, soak or steam the plywood. For dry bending, apply heat using a heat gun, oven, or hot plate.
Step 4: Bend the Plywood
Carefully bend the plywood around a mold or jig. Use even pressure to achieve a smooth, uniform curve.
Step 5: Secure the Shape
Once the plywood is bent, clamp it into place and let it dry or cool. Ensure it holds the desired shape during the curing process.
Step 6: Finishing the Bent Plywood
After the plywood has set, remove the clamps and form. Sand the edges and finish the surface for the final touch.
Tips for Successful Plywood Bending
- Avoid Cracking: Always ensure the grain is oriented correctly and don’t force the plywood to bend too sharply.
- Achieve Smooth Curves: Use jigs and forms to guide the plywood into the desired shape for even, consistent bends.
- Maintain Proper Moisture: Keep the plywood at the right moisture level to avoid warping or cracking.
- Allow Enough Drying Time: Give the plywood time to fully cure before removing it from the form to ensure it holds its shape.
Applications of Bent Plywood
Bent plywood has a broad range of applications, from furniture to architecture. Some of the most common uses include:
- Furniture Design: Bent plywood is widely used in the design of chairs, tables, and storage units.
- Architectural Features: Plywood is often used in creating curved walls, ceilings, and structural elements.
- Product Design: Plywood’s flexibility makes it suitable for various consumer products such as light fixtures and artistic pieces.
- DIY Projects: Many DIY enthusiasts use bent plywood for small-scale projects like shelving, home decor, and sculptures.
Common Mistakes to Avoid When Bending Plywood
- Using the Wrong Type of Plywood: Choose the correct plywood for your project. Flexible or bending-grade plywood is best for curving.
- Not Allowing Enough Drying Time: Don’t remove the plywood from the form too early.
- Incorrect Pressure Application: Apply even, steady pressure when bending to prevent cracking.
Mastering Plywood Bending
Bending plywood can be an incredibly rewarding skill for woodworkers, architects, and designers alike. Whether you’re creating elegant curves for a piece of furniture or designing a unique architectural feature, understanding how to bend plywood opens up endless possibilities. By mastering techniques like wet bending, dry bending, kerf bending, and laminating, you can create beautiful, functional designs that showcase the versatility of plywood. With the right tools, materials, and techniques, you can achieve flawless, smooth curves in your woodworking projects.